Embroider a QR Code on Your Pet's Fabric Collar
An embroidered QR on the collar fabric itself — no dangling tag, no metallic clinking, no chew target. Looks custom, scans like a billboard, survives washing. This is the practical how-to.
Why embroider on the collar (vs a hanging tag)
- No clinking — dogs and cats hate the metallic noise of a hanging tag. Embroidery is silent.
- Nothing to lose — stitched into the collar permanently. Can't fall off.
- No chew target — your puppy can't pry it off because it's woven into the fabric.
- Looks custom — replaces a generic store-bought feel with a handcrafted piece.
- Washes well — polyester thread survives 50+ cycles.
What you'll need
- A blank fabric collar — canvas, nylon webbing, or heavy cotton. Pre-made unbranded collars from Etsy, Amazon, or pet stores work; you can also sew your own from webbing.
- An embroidery machine (any home or commercial — see format guide).
- 80×80 mm hoop.
- Heavy stabilizer (cut-away) — collars need support against the puckering forces from satin stitches.
- Polyester thread — survives washing better than rayon. One spool foreground color.
- Tagback DST or PES from your dashboard.
Step 1 — Choose the right collar fabric
Not all collars take embroidery well:
| Collar fabric | Works? | Notes |
|---|---|---|
| Heavy canvas | Excellent | Most popular; takes detail beautifully |
| Cotton twill / duck | Excellent | Soft, dog-friendly |
| Nylon webbing | Great | Standard utility look; ballpoint needle |
| Hemp | Great | Natural look |
| Leather | Specialty | Possible with leather needle; slower |
| BioThane / TPU-coated | Skip | Won't take satin stitches reliably |
| Stretchy / elastic | Skip | Distorts the QR shape |
Buy unbranded blanks specifically for embroidery — search "embroidery blank dog collar" on Etsy. ~$8–15 each, available in widths from 15mm (cats) to 38mm (large dogs).
Step 2 — Plan the placement
The QR should sit flat against the side of the dog's neck, not on top (where it's hidden by fur) or under (where it gets dirty). For most dogs, that's the section roughly between the metal D-ring and the buckle.
Measure twice: hold the collar on the dog, mark with chalk where the QR will sit. Unbuckle, take it to the machine. The 80mm QR fits on collars 25mm+ wide. For narrower cat collars, scale the design to 60mm and use a 60mm hoop.
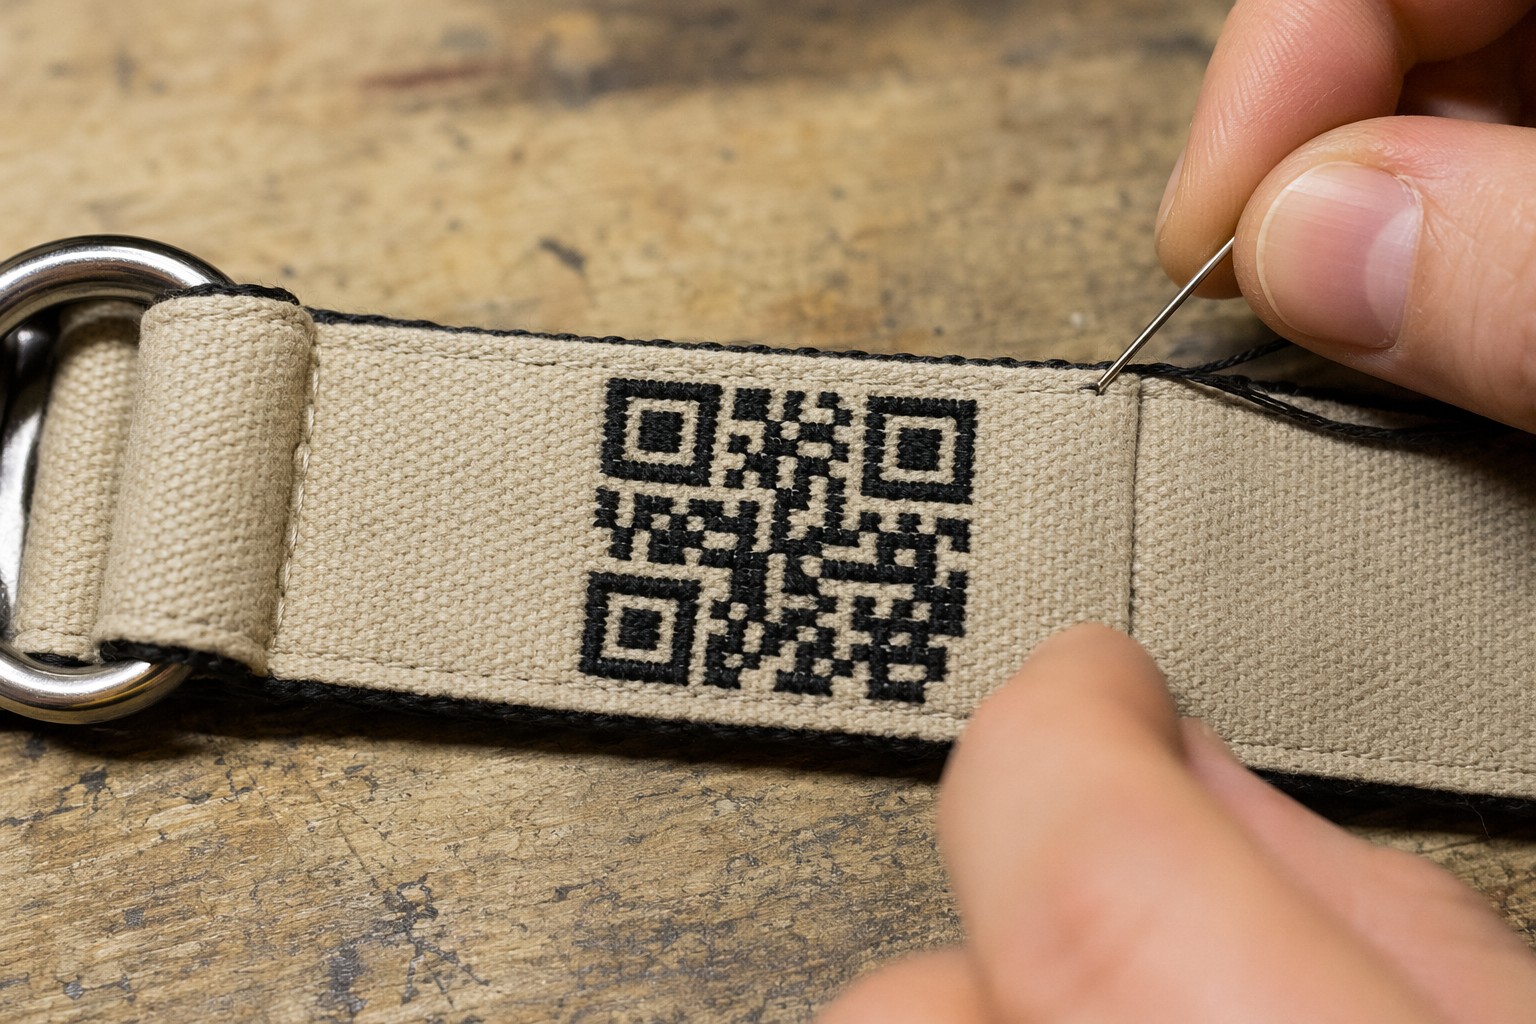
Step 3 — Hoop the collar
This is the trickiest step because a collar is a long strip, not a flat panel. Two approaches:
Method A — Standard hoop with extension stabilizer
- Cut a piece of medium cut-away stabilizer 200×200 mm.
- Lay it in the bottom of the hoop.
- Lay the collar across it, with the marked QR area centered in the hoop.
- Pin or tape the collar ends to the stabilizer (outside the hoop area).
- Close the hoop carefully so the collar stays positioned.
Method B — Adhesive backing (preferred for nylon)
- Use self-adhesive stabilizer (Sulky Sticky+, Floriani Wet n Stick).
- Hoop the stabilizer alone; score the paper backing inside the hoop with a pin.
- Peel the paper to expose the sticky surface.
- Press the collar flat onto the sticky stabilizer in the right position.
- No tension on the collar = no distortion. The most reliable method.
Step 4 — Stitch
Load DST/PES into your machine. Color = high-contrast against the collar. Standard combinations:
| Collar color | Thread color | Notes |
|---|---|---|
| Black | Bright yellow | Highest visibility — easy for strangers to spot |
| Tan / khaki | Black or dark brown | Outdoor look |
| Red | Cream / white | Festive |
| Navy | White | Classic |
Run at 600 spm (slower than max). The first row of QR modules is the test — if you see fabric puckering, pause and re-hoop. Total stitch time on most home machines: 10–15 minutes.
Step 5 — Finishing
- Remove from hoop.
- Trim stabilizer close to the embroidery — leave 2–3 mm border for stability through wash cycles.
- Trim jump-stitch threads on the back.
- Iron from the back with a damp pressing cloth — never directly on the embroidery.
- Test scan: phone camera 15 cm away.
What to write next to the QR (optional)
Many makers add a small "SCAN ME" or "IF FOUND" text next to the QR — embroidered as a separate design file. This signals to a stranger that there's something to do. The Tagback Designer doesn't include this text by default (the QR stands alone), but you can add it in your embroidery software.
Multi-pet households
Each pet needs their own tag (different Tagback QR). Easy workflow: create three tags in the dashboard, download three DSTs, batch-stitch three collars in one afternoon. Total cost: ~$30 in collars + ~$0 in tags.
FAQ
How long does it last in everyday use?+
Polyester embroidery thread survives 50+ washes and 2+ years of outdoor use. The collar itself usually wears out first. Many users get 3-year life from an embroidered collar.
Can I machine-wash the collar?+
Yes. Cold water, mild detergent. Hang dry to preserve the embroidery's crispness.
Will my puppy chew through the embroidery?+
The embroidery is part of the collar fabric — chewing through both is much harder than removing a hanging tag. But determined chewers will eventually damage anything; check periodically.
What if my dog grows out of the collar?+
Buy a new collar, embroider again. The Tagback QR record stays the same — no need to create a new tag. Reuse the DST/PES file.
Can I add multiple QRs to one collar (e.g. front and back)?+
Yes — just stitch the same design at two positions. Or use the dual-sided embroidery technique (advanced). One QR scans well enough for most cases.
Start protecting what matters
Tagback is free, forever. No subscription. No app needed for finders.
Create your free tag